Thursday, April 11, 2013

Chitting Runner Beans for our Bean Tower!

About a month ago I built the kids this teepee structure from various tree limbs/cut young trees that we had piling up behind the back yard. Inspired by pictures on Pintrest, I'm going to try and grow beans up the poles so that it will become a little hideaway for them to play in while I'm gardening (and maybe they will even get curious enough to pick a fresh bean pod and eat it!) I have fond memories of my mother's vegetable garden, sitting on the edge of raised beds, plucking fresh veggies and eating them right off the vine. I credit that experience for why I love vegetables so much. My mother is amused by my fond memories- she swears all she remembers is me whining about how hot/sunny/cold/icky it was to be outside and how much I wanted to be back inside!

Of course, every bean seed in my stash is a bush-type not suited for reaching to these kinds of heights, so I'll be trying something new this year- scarlet runner beans.  To get a jump start, I "chitted" them by soaking them overnight until they swelled and then putting them in a damp paper towel in a plastic bag for two days until I saw little white roots:


You have to handle them very carefully, because that root can break off easily and then the chances of it turning into a plant are slim. I piled up compost around the base of the teepee structure and placed one bean per pole. Unlike what the picture implies, I did plant them with the root going down into the spoil, I promise!


Because this is going to be the kids' corner of the garden, I also added some kid-friendly flowers: sunflowers! I had a bunch of old packets, so I don't even know if any of these will germinate, but I mixed them together and sprinkled them around the outside of the teepee. Then I covered the beans and sunflower seeds with about an inch of compost and watered it all in. Now the worst part- waiting :)


A peek at how the rest of my garden is doing- along the outside of the chainlink fence that keeps my labrador out of my garden are a row of snap peas, guarded by a row of yellow onions, and finally in the bottom there is some spinach. If I get enough for one family meal I will be happy!


Thursday, April 4, 2013

Germination Experiment #2- Lavender

Update on the Canna Lilies: Apparently just because it isn't below freezing outside doesn't mean that they can handle chilly temps when they are that young. Every last one of my South Pacific canna lily seedlings got root rot, even though I never left them outside at any temperatures below 40F. My "yellow" cannas are still alive, though haven't grown much in the past month. I'm thinking that I just started them too soon. That's what I get for trusting weather advice from a groundhog, huh? I can't remember the last time we had such a chilly spring! But it looks like things are slowly warming up and at least the freezing temps should be behind us, so I've begun the painstaking process of hardening off some of my seedlings. Wish I could wait till it was a bit warmer, but they've outgrown their current containers and I just don't have the indoor space to transplant them into larger containers. Fingers crossed that they fare better than the canna seedlings!

And now for germination experiment #2 of 2013- growing lavender from seed. I've done it before, but that was in college when I had use of the horticulture department's greenhouse with intermittent mist system, and even then I had at best marginal success. Lavender had been one of those plants that always makes me want to tear my hair out- it isn't supposed to be *that* hard to grow, but somehow I've managed to kill so many lavender plants that I've lost count. I've balanced soil pH, built raised beds for better drainage, talked to the owner of a lavender farm and followed her advice to the letter, but still no success.

So why am I still trying? Maybe I have an Edison complex and I'm determined to make the light bulb work, I'm not sure, but I love lavender so much that I cannot give up the dream of having it bloom in my own garden. So I'm growing them from seed because it is less financial investment. Some of these seeds are very old, received in trades from other gardeners on the internet years ago, and others are commercial seed bought this year. We'll see what happens.

First of all, they take a while to germinate. Possibly as long as a month, which in my book is a long time to keep a pot at the perfect temperature, moisture level, and mold-free conditions that are optimal for germination. I had some room in my Park Seed Bio-Dome and planted 12 seeds, of which one germinated very quickly, and at now 2 months later I have yet to see signs of the other 11 so I'm gonna assume they aren't going to happen. Still, one seedling is better than none!

Next was the little pot below- I wanted to try stratifying lavender, which I have read can increase germination rates, so I planted these seeds in a 3" peat pot, which I then put in a plastic baggie and dropped in my bottom fridge drawer. Less than a week later I was getting something out of that drawer when I noticed sprouts! I pulled it out and put it on a sunny window sill, and it seems to be doing well.

Encouraged by this success, I expanded this operation by stratifying 4 different types of lavender seed in zip-top bags filled with moist vermiculite. I left them in the fridge for ~5 weeks, during which none of them sprouted. Then I took them out of the cold and in my rush to head out of town for Easter weekend didn't have time to pot them up, so I tossed them in a kitchen cabinet and nearly forgot about them. A week later I remembered them and pulled them out to find that they were sprouting in the bag!
 
Potting up seedlings that tiny is tricky business because they are very fragile. It would have been much better to pot up the seeds when they first came out of the fridge. Plus in that dark cabinet they got a big "leggy", but I did my best transferring them to 3" peat pots. I pilled in the rest of the vermiculite around the seedlings just in case there were un-germinated seeds still hiding in there.
 
After misting the surface generously I put plastic baggie tents over them and moved them to a sunny window. Hopefully they will do well! I will try to update their progress in a couple of weeks.


Sunday, March 10, 2013

Canna Lilies from Seed

This year's garden experiment (well, one of many experiments) is growing Canna lilies from seeds. I didn't expect much success, so now that things are looking really good I wish that I had taken more pictures of the earlier steps in the process. It was incredibly easy and I have been told that it may flower the first year from seed, so fingers crossed!

First, I obtained seeds from 2 sources. From Park Seed, "Canna South Pacific Scarlet" which won a 2013 All-America Selections Flower Award and is very pretty :) Picture from Park Seed's website: 


The packet came with 6 seeds that had been pre-scarified (a small hole had been drilled through the outer shell to help water enter). I poured boiling water over them and let them soak for a few days, changing the water when it got cloudy. Then on Valentine's Day I planted them 3 seeds to a 3" peat pot with my homemade seed starting mixture (1 part perlite/ 1 part vermiculite/ 2 parts peat moss, which is acidic, so I added a little baking soda to the wet mixture until my pH meter read neutral. Little know fact- my day job is teaching chemistry at the local college!). Seedlings popped up within a few days and grew very quickly. I had 5/6 germinate, which is pretty good. I didn't want to deal with their roots becoming too intertwined so I separated them into individual 5" peat pots today, less than 4 weeks after sowing the seeds:


After watering them in I left them in a tub on my porch- these babies have been inside until now, but I don't have room inside for those larger pots so they are going to have to harden off earlier than planned. My porch is a pretty nice place for this- it is south-facing so it gets lots of sun during the day to warm up the concrete, which acts as a heat sink that radiates the heat during the night, keeping it a bit warmer than the garden.  Plus a large Carolina Jessamine vine gives it enough speckled shade that the seedlings won't get scorched their first few weeks out (I hope!). We are close to our average frost date of March 15, but my home has been known to get light frosts into the first week or so of April (which I know is nothing to complain about, compared to Northern gardens!) so I will have to keep a close eye on them and cover them up if it looks like frost. I hope they do well- I am looking forward to those big red flowers attracting hummingbirds to my garden this summer!

The second set of seeds came from ebay, at the advantage of it being 1/5 the cost of Park Seed but the disadvantage that I have no idea what the cultivar is. The listing simply said "Canna indica- Yellow" but the picture looked exactly like Canna x generalis 'Cleopatra' which is on my wish list. Here's hoping they turn out nice! These didn't come pre-scarified, so I did that myself by rubbing them against a nail file until I saw a bit of the white undercoat. Soaked them in water for maybe 2-3 days until most of they swelled with water, and planted them in 3" peat pots. Again I had 5 out of 6 seeds germinate, so maybe that's a trend?

Here they are only 2 weeks after planting the seeds. I kept the pots in a gallon ziploc bag for the first week so that they didn't dry out during germination.  I love that peat pots are biodegradable but hate the way they are so hygroscopic that they suck moisture right out of the potting mix. Those are lemon balm seedlings next to them in the picture, btw. Canna lilies are hardy in my zone (7b), but zones 7a or higher would probably want to lift the bulbs during the winter. I have had some clumps growing in my back yard for 5 years now without any winter protection and they haven't seemed to suffer from the neglect yet!


 Here's hoping my canna lilies keep growing fast! So, what do you think?  A pretty easy way to add tropical flowers to your garden, and much cheaper than buying bulbs or potted plants. Can't wait until spring is officially here! It was in the mid-60's F today but I know that with our Carolina springs, that won't last. Anyone else have luck growing canna lilies from seed?

Saturday, February 20, 2010

Chocolate, chocolate, chocolate!

I won't lie, I am a kitchen snob. I don't believe in recipes that take less than 12 ingredients and don't require at least 2/3 of my counter space and half of my mixing bowls to prepare. But I have been searching for the perfect flourless chocolate cake forever, and tried all sorts of fancy variations, but none of them had the right texture. So, in a moment of desperation, I tried one of those tacky online video instructionals:

www.metacafe.com/watch/1119791/how_...

I had little faith in it, so I halved the recipe and use a 6" pan. It only has 5 ingredients, no mixer required, and I didn't even have to separate my eggs.

Oh. My. God. It is soooo good! I had been planning on topping it with sliced strawberries and drizzling on some sweet cream cheese topping, but I ended up eating it plain, it was so good!

If you try this recipe, please let me know! If you are on a diet, please ignore the fact that there is a whole cup of butter in this cake lol. And use real, unsalted butter. Margarine or shortening won't cut it. I used Ghirardelli bittersweet chocolate at a 60% cocoa rating (your cake is only as good as your chocolate, after all), and Hershey's Special Dark cocoa powder, so it was extra rich.

I was gonna post a picture. I promise. But the cake didn't even survive long enough to fully cool down. (Don't worry, I had help!) ;)

Monday, February 1, 2010

Ribbon Cube Tutorial

When a baby is handed a new plush toy, often the first thing they usually go for... is the tag. They crinkle it, chew on it; for some reason they are just fascinated by it. So I made a cube that is covered in tags. There is a company out there that already makes these and sells these, but they are out of my price range. I won't mention their name because they are very very sensitive about copyright and such. I am not making these to sell, nor to I wish any reader to. The original maker of these toys retains such rights. I just can't afford them!

Materials:

Small amounts of soft fabric (fleece, minky, or fuzzy fabric is good).
Ribbon scraps (satin, grosgrain,organza, or taffeta. Preferably a mixture of colors and textures)
Polyfill
Jingle bells (optional)

I save ribbons used on gift box decorations for this kind of stuff. Most of the ribbons here were leftover from my baby shower!

First, cut six squares from the fabric. I did two of each color so that no two colored touched on the cube. I made my squares 9"x9" because the squirt loves to glomp onto big plushies, but a more reasonable size is probably 7"x7".

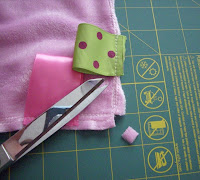
Cut the ribbons to approximately 24 - 4" strips. Fold the ribbons and press (careful- use a low iron setting, and watch out for melting!). Then pin, facing inward on the right side of the fabric, along the edges. For two squares(of the same color), cover 4 sides. For 2 squares, cover 2 opposite sides. Leave the remaining two without any ribbons. You can place the ribbons randomly, or in a pattern. Stitch over top of the ribbons, securing them.


Once all the ribbons are secure, take the two taggless squares and the two squares with only two tag sides, and sew them together at on the tag sides, right sides together. Alternate colors to make a strip:


Then sew the two ends together to make the body of the cube shape. Now take your two fully-tagged squares and clip little squares into the corners. This is so that the corners of the cube with turn correctly.


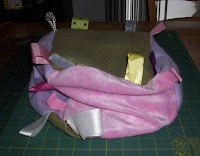
Now sew the top and bottom to the body of the cube, right sides (and tags) all in. Make sure to be careful pinning at the corners. Leave half of one edge open to turn and stuff the cube. Turn right-side out. You now have a nicely deflated cube!


Stuff with polyfil and jinglebells. I have found that placing the bells just inside the fabric sides, rather than in the middle of the stuffing, allows for better sounds. Stuff to desired firmness. I prefer kinda soft so that the squirt can squish the cube in her grip.


Sew closed and ta-da! Ribbon cube!

Sunday, January 31, 2010

Fabric scraps and Flowers!


Well since we have been snowed in all weekend, I was bored and could not drive to the store to buy stuff to craft with... so I had to work with what I had at hand :) Firstly, here are a few small projects I did with scraps of a pink paisley satin leftover from a project. I used a babyfood jar to make a button jar, then made a flower using the tutorial found here.


I used the flower as a corsage pin to dress up a top I found at a thrift shop:


Then I glued fabric to a thick piece of cardboard and decorated some clothespins to make a mini project board using this tutorial. Hers looks way better than mine, but hey, she was using a real wood board and jumbo clothespins. Mine was free.


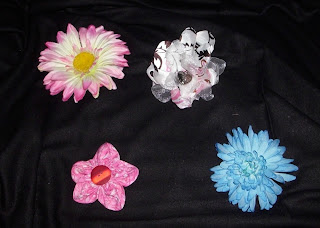
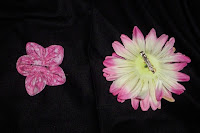
Next I made some flowers to put on the squirt's hats that I had crocheted last weekend. I did this by attaching pins to the back of silk flowers, and by making flowers from scraps of fabric.

For the pink button flower, see this tutorial.


I think the squirt likes her new hats!


Sunday, March 1, 2009

Baby grabbie ball!


This little fabric ball is made from scraps of fabric leftover from old projects. It is the perfect size for little babies to grab and can be made out of bright colors to capture their interest. It takes about a quarter of a yard, total, and you will probably want to make it from two different contrasting colors.

First, make the template from thin cardboard (an old cereal box is perfect). Use a protractor to make a semi circle with a radius of 3 inches. Cut it out and trace it onto another piece of cardboard. From this, use the protractor to make a petal shape out of half of the semi circle. Cut this piece out.


Cut 12 semi-circles from fabric A and 12 petals from fabric B.

Fold the semi circles in half and make a small snip at the top of the curve, at the midpoint. Unfold.

Place one semi circle and one petal together as shown, right sides together.

Now, using 1/4 inch seams, sew along the outer left curve, stopping when you reach the top midpoint (where you snipped).


Stop with the needle still down, lift the presser foot, and fold the semi circle on itself, lining up the right side of the petal with the right side of the curve (see photo). Stitch down this side.

Trim the corners as needed and turn the petal right side out. Stuff firmly with polyfil, and if desired, a jingle bell. Turn the raw edges inside and slip stitch the petal closed. Repeat to make 12 petals.

Hand sew three petals together on the straight edges to make a cluster. Make four clusters.


Tuck two cluster together so that four petals come together at a point. Hand sew along the straight edges and add another cluster to make the ball (it is a bit like putting together a puzzle, but not too hard to figure out what goes where). When adding the fourth cluster, you will not be able to reach the straight edges and thus can just tack together at the petal points.

Enjoy!